How I installed the Umbrella Clothesline
Author: Ray Herndon
Here was my experience installing the umbrella clothesline from Best Drying Rack. In general, it was pretty easy to assemble. It doesn’t require any special tools or cement. I put mine up in about an hour. Below are the steps and some tips.
My Installation Steps and Tips
Pick A Good Location.

An umbrella clothesline requires less space than the permanent T-post style clotheslines, and it can be removed when not in use. So it is easier to find a good place for it than a traditional clothesline with ropes strung across the yard from post to post.
Assemble the Ground Socket.

Turn the whole assembly on its side and slide the pipe forward so that about 4 inches extends past one end of the wing assembly. This 4 inch side will be the TOP of the ground socket. Snug down the wing nuts, but not real tight. You do not want to deform the tube.
Dig a Hole, and Level the Tube.
Dig the hole about 22 inches deep, so the white tube will fit completely down into the hole. Make the upper half of the hole wide enough to place the Ground Socket inside with the edges of the wings just touching the sides of the hole. The lower half of the hole can be much smaller since the wings don't go down there.
Put a scoop of gravel into the bottom of the hole. Stand the assembled ground socket on the gravel. Check that the top of the white tube will be about 1/2 inch above the surface of the surrounding sod. Add or subtract gravel to get the height right. The 1/2" height is important because too high and you can hit it with a mower, and if too low the clothesline will not rotate around properly.

By not using concrete, you gain the ability to move the ground socket if you ever want to. And you can re-level the whole thing if your clothesline ever starts to lean. Either by digging it up and re-setting it, or by just soaking the soil near the socket and pushing the whole thing back towards level. You can't do any of those things if you use concrete.
Connect the Lower Tube.

Add the Foot Clamp.

Loosen the foot clamp by rotating the handle a couple turns counterclockwise. Slide it onto the lower tube and position it about 12 inches from the bottom end. Snug the clamp, but not real tight.
When you put the clothesline down into the socket, the clamp position determines the height of the ropes. If they are too low, remove the whole umbrella clothsline from the socket, lay it on the ground, then loosen and re-position the clamp so it is about 9" from the bottom of the tube. If the ropes are too high, follow the same basic steps but move the clamp to 15" or even 18" from the bottom of the tube.
Start Raising the Clothesline's Arms.
This takes a little muscle and thought to do. First, remove the shipping protector top cap to free the arms of the umbrella. Then insert the clothesline post into the white Ground Socket pipe. Ropes should only hang for each arm to it's neighbor. Make sure that the ropes are not tangled.
To start raising the arms, pick two that are across from each other (not neighbors), and grab them in the middle. Pull them away from each other a bit. As you do that, the big connecting bracket at the bottom of the arms will start sliding up the post. The ropes will start pushing you back as the arms rise, so just duck under and re-position yourself between the lower and upper ropes as that happens. Occasionally switch which pair of arms you are pulling apart. When the metal connecting brackets at the bottom of the arms reach your bellybutton height, it is time to change the arm raising method to the one described below.
Tension the Ropes.
Now it is time to raise the arms high enough for the upper Tensioning Bar to reach and connect with the Tensioning Lever. Start by moving yourself to the section of the umbrella where the tensioning lever is located. Step in amongst the rope, close enough to the center pole that you can put your foot on the foot clamp. Grab two arms down next to the connecting bracket, and lift them high enough for the tensioning bar to reach the lever. (see picture)

If the lever does not want to move all the way, stop and check that none of the ropes are tangled or are wrapped around a tip of an arm. Don't force it.
When you are not using the umbrella clothesline, you have 3 choices of how to leave it. In my opinion it depends on how often you are going to use the clothesline, and how comfortable you are with whole opening and closing process. If you are only going to use it once a week, and you're good with re-opening it each week, then go with option #1 below. But if you are going to use it two or three times a week, see the other options.
- Close it, or fold it up. (with or without the fabric cover installed)
- Leave it open and tensioned. (easy, but will eventually stretch out the ropes)
- Leave it open, but release the tension. (makes ropes last longer, and simple to flip the lever)
My personal choice was #3 (leave it open and just relax the rope tension) because it was so easy to do. Flip the tensioning lever up after unloading the dry clothes, then flip it back down when time to dry a new batch. Easy peasy, and it extends the life of the whole unit.
Hang Out Your Laundry.
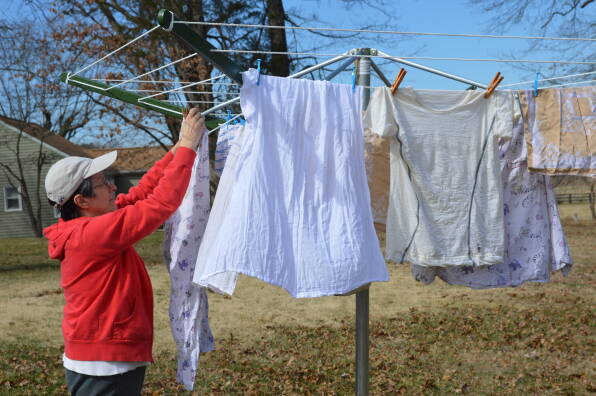
Once the arms are up and the rope is tight, it's time to dry some laundry! Drying clothes outdoors is a little different than drying them indoors, mostly because of the wind. Indoors you can just drape clothing over a drying rack or basement clothesline. But if you do that outdoors, and some wind kicks up, your clothes will end up all over the yard. That is why they invented clothespins.
We bought both the wooden clothespins and the plastic clothes pegs. My opinion is that they each work better on different types of fabrics. The wooden clothespins are better for thicker fabrics such as jeans, towels, sheets, and anything larger than a T-shirt. While the plastic clothes pegs were faster and better for lighter fabrics such as socks, underwear, or anything T-shirt size or smaller. Add a clothespin bag that hangs on the ropes, or a clothespin apron to wear around your waist, and you are good to go.
Be sure to see my related article: Drying Laundry on a Clothesline to learn all the great reasons for drying laundry outdoors, and discover some useful tips.